eCraft Q & A

Just from the Silhouette VS. eCraft post, there's been a few questions from readers and i want to set it all straight and pass that along:)

So first question:

Does the eCraft cut fabric?

YES.  It does!  The following is cut and pasted from the official eCraft site:
What can it cut?
"Paper (standard, flocked, glitter, magnet, adhesive backed), card stock, vellum, vinyl, felt, organza, grunge paper, grunge board, wood veneers, chipboard, Fun Foam, and many other materials under 1mm thick. Want to decorate cake or cookies?...no need to buy a separate machine. Use the eCraft to cut Lucks Edible Image Food Decoration Sheets and easily add edible designs to cupcakes, cookies and much more!"

So from that, YES, it cuts all sorts of materials, specifically anything under 1 mm.  I watched a few demos around the web and found that it also cuts cotton too!  
And not only does it cut fabrics, it cuts decoration sheets for cakes and cupcakes too!?  That's something new!  Well, no need for the Cricut Cake machine now ;)

During my research, I found another blog that tested the machine with fabric and did a marvelous job!

So I feel good about that.  My creative well-being will not be hindered by this machine.  It will only blossom and grow!...wow, that was a bit cheesy...sorry about that.

Next question that I was asked:

Can you download your own designs to the eCraft? 
Yes you can!  Here's a snip from the website:
"Bring your creativity to life with the eCraftshop Design Software. Connect your eCraft to your PC to access even more features than the eCraft offers as a standalone machine. Create banners 12" by any length, personalize images from your SD Card, customize and import your own SVG designs, and more! You can weld, flip, stretch, rotate, size, shadow, and control your own virtual cutting grid for perfect image placement and an economical use of space and material."
Can I use my own designs? 
Yes, using our eCraftshop Design software. The software will allow users to import SVG files and access True Type and Open Type Fonts, then establish draw and cut lines, or create your own images within the software using our design tools.


And just in recent months, the softwares SCAL (sure cuts a lot) & MTC (make the cut) have made it compatible with the eCraft!  If you do not know those programs, they work with electronic cutting systems in helping the user design and then cut them.  It's really user friendly and it's really used widely.  
So that's a plus too!

So for  now, my research continues...
What's your favorite thing about the eCraft that you've found?
What other questions do you have?

scrapbook sundays #4.

I'll first announce the winner for the Graphic Prints :)

Random Integer Generator

Here are your random numbers:
12
Timestamp: 2011-03-27 15:30:23 UTC

#12 is:
Stephanie said...

And, I follow you. I actually just found you tonight from Show & Tell Saturday at Be Different.

plannedimprovisation at gmail dot com


Thanks you ladies for linking up last week! Such wonderful creations!

Loving God with Living Simply made this Planning board and she's shows you how to make it!

Holly over at 504 Main made these chicks that just scream spring!  I love that she made this from scrapbook paper!

Letters and Lace embellished this envelope!  I love all that texture.

Maryanne over at Scrappy Gifts made this adorable LO.  Perfect for scraps you might have lying around the house!

Thanks again ladies!
Alright, grab yourselves a Feature button!!


Here's my LO for the week:
This is my 2nd darling daughter.  She still has those cheeks and huge dimples! She was 9 months in this picture and she is almost 4 now!
This is a fun one for multiple pictures.


I'm linking up to THESE parties!

Alrighty, show me what you got this week!
I would love for you to play along!
Rules:
Please link the specific post and not just the blog.
And please grab a button and put in somewhere on  your post or blog so that others can join us!

I'll feature those who link back here, either with the button or a text link!  That's my sneaky way to getting the word out about this fabulous party :)


Silhouette VS. eCraft

So after 5 years of owning and using a Cricut Expressions Electronic Cutting machine, it has died.  It was a sad day...sad sad day.  I used that baby religiously.  All my LOs had something from it.  It was a great machine.
But now that my options are open, I want to see what is out there to weigh my options because of course, I am getting another one...right, husband? 
So i've been researching and doing my homework.
I decided to look at 2 more popular cutters that fell in my price range, The Silhouette & the eCraft by Craftwell.
Here's what I found:

My first opponent: 

The Silhouette SD from Silhouette America is a digital cutting tool for personal use that cuts many materials. It connects to your computer just like a printer, but instead of printing designs it cuts them with a small blade. With the machine connected to your computer, you'll get access to all of the fonts on your PC plus the thousands of cuttable designs. The Silhouette is a digital cutting tool can also use pens to draw. These pens are called sketch pens. Similar to the functioning of a home printer, it cuts paper and other materials like cardstock, adhesive vinyl, heat transfer material, rhinestone templates and other specialty media with a blade instead of printing onto it. The creative possibilities are endless with the Silhouette SD

What Can it Cut?


And the competition:
eCraft by Craftwell, retails around $299.99


Craftwell is proud to bring you eCraft...
The first and only electronic cutter that allows you to cut without a mat.  
Its ease of use combined with advanced technology makes the eCraft the perfect cutting system for all consumers- beginner to expert. It is ideal for scrapbooking, banners, paper crafting, card making, fashion designing, home decor, and so much more.  The eCraft's unique design and paper feeder system make it easy to cut materials automatically, without the use of a cutting mat. Use the Paper Tray to stack multiple sheets at a time, or use the Roller to cut 12" by ANY length.
The eCraft is ultra slim, and its lightweight design and onboard storage compartment let you take it anywhere. Use it on its own with SD Image Cards, or attached to a computer with the eCraftshop Design Software that comes in the box! With the large selection of fonts, shapes and designs, anyone can be an expert in minutes. Making great looking projects has never been easier!
  • 3 ways to feed paper: from the front, the paper tray, and the roller. (no more messy cutting mats)
  • Handles materials up to 12" wide by ANY length
  • Draws and cuts without changing from a blade to a pen
  • 2.8" backlit LCD display for easy navigation and image selection
  • Works off of easy-to-store SD Image Cards, with hundreds of shapes to choose from
  • No computer required, but eCraftshop Design Software included for greater versatility.
  • Adjustable pressure settings for kiss-cutting (vinyl) and multi-cutting (thicker materials)
  • Clear Cut Indicator lights up when the blade cuts all the way through your material
  • Pause button allows you to adjust the pressure setting mid-cut (less mistakes = less paper wasted
What can it cut?
Paper (standard, flocked, glitter, magnet, adhesive backed), card stock, vellum, vinyl, felt, organza, silk, cotton fabrics, grunge paper, grunge board, wood veneers, chipboard, Fun Foam, and many other materials under 1mm thick. Want to decorate cake or cookies?...no need to buy a separate machine. Use the eCraft to cut Lucks Edible Image Food Decoration Sheets and easily add edible designs to cupcakes, cookies and much more!


Well, quite the comparison!
This was harder than I thought!
So let's break this down to pros & cons:

Silhouette:
Pros: 
Cuts all types of materials
Connects to computer for endless cutting options
Use pens to draw as well!
Unlimited Creations!

Cons:
No catridges, dependant to computer
must have a mat to cut.


ECraft:
Pros:
No Mat!
Cuts all types of materials
pen & blade is same so you don't have to switch them out
Endless length to cut.
No computer required, uses SD images cards
Comes in pretty colors :)

Cons:
software needed for personalization

Hmmm, after sorting through those pros & cons, I think I have my choice.
I'm leaning towards the eCraft.  And my main influence is the No Mats!  Having the Cricut for 5 years, that's what bothered me the most.  If I needed to do something, I had to make sure I had a mat that was sticky enough for the job.  If not, I had to run to the store and spend $15 for more mats!  It got really annoying to keep throwing money out like that.  They do SD images cards which is similar to the Cricut's cartridges but they aren't as expensive and they have MANY more options!

But I want to ask you guys, Do you have a Personal Electronic Cutter?
Which one do you use?
Which one would you want?

My research continues....

thrifty thursdays #4.

***reminder for giveaway going on right now!  Ends this Saturday.  Enter HERE***


Let me just say, that I LOVE you guys and your links.  I get so gitty every time I see a new link and comments :)  Again, this week just rocked.
Such great finds and resourcefulness!
love it.

So it was a tough decision picked a few to feature.  I wish i could feature them all but I can't :( 
But here's just a few of my favs this week:

Daily Crysalis found this adorable owl..and you will NOT believe the awesome redo she did on this.  Head over there to check it out!

Some beautiful plates & a cake stand can be found over at The Thrify Closet.

On Sutton's Place did a marvelous PB Knock-Off and saved some serious $$.

Creative Cain Cabin did a marvelous job at redoing a Thrifty-Store dress!

I Heart My Glue Gun built her own pedestal for her laundry room!!  Amazing!

and Bless My Nest whipped up this adorable Toile Ruffle Pillow!

Thank you guys SO SO So much for linking up and playing along!
I love your style!
Grab yourself a button :)


So last week you got a peek at my son's room.  I have this lovely idea in my head about it.  And the rental we moved into, his room just happened to have a red wall, like you saw last week.
Which is perfect because i'm going for a red, blue, yellow, white vintage sort of look.

So imagine my joy when I found this trunk for $3 at a local thrift store.  
I kid you not!

And i had a little fun taking pictures with my baby too :)

Perfect condition too.

Then I was able to hit Goodwill too and found some more VINTAGE SHEETS!
I  think I might be the only one in the area hoarding these...hopefully.

I love the light blue with yellow puppies. so cute.

And i love that yellow flower flat sheet.  Makes me feel happy :)

That's a wrap this week.  Things are getting crazy around here.  In 2 weeks, i'm doing a craft fair so i'm doing some wreaths and other handmade goodness.

I'm linking to THESE parties!


Now the fun part!
Link up any thrifty find, redo, antiques, or just anything thrifty!
Please grab a button and add it to the post or blog so that others can follow along too!
Link specific posts and not the main blog :)
I'll pick a few to feature next week!


Guest Post: Anything Virtuous.

Hey guys.  I have a treat for you.  Steph from Anything Virtuous is here today to show you how to do an adorable fabric bracelet.


 I feel really cool because she's my cousin.  She is just beautiful inside and out.  And her bracelets don't disappoint.

Here's a bit about Steph and her blog:

I earned a B.A. in Communications from Brigham Young University. After working in and out of television news, law firms, and substitute teaching assignments, I'm now a professional mother. When I'm not hanging out with my ridiculously adorable son, I'm blogging, songwriting, or crafting.
My sincere concern for women young and old is what drives me to do this. Through my experiences in work and life itself, I am quite aware of the messages that women are pelted with every day. I'm tired of feeling down or disgusted when I open a women's magazine or see images on TV or the internet, and I want to make a positive difference.

I created Anything Virtuous to offer a site that shares helpful tips and thoughts, uplifts its readers, and lets them know about other great sites and products out there. I also wanted a venue to share my thoughts for my future daughters, and also for every other woman regardless of her age. I believe we are all daughters of Heavenly parents and that we ought to be reminded of it often.

Since I was a teenager my motto has been to positively motivate others through words and music. I am constantly working on both and striving to "stand a little taller and be a little better." -- Pres. Gordon B. Hinckley


Wanna add some wowza to your wrist? If I can do it, you certainly can. 
DIY Fabric Bracelet
You will need:
Appx. 4.5 x 8.5 in fabric
Pellon (just smaller than said fabric)
Appx. 2.5 in ribbon/bias tape, etc.
A button to latch
Embellishments, such as ribbon, lace, jewels, fabric flowers, tulle, beads, etc.


Cut the fabric to your desired bracelet size. I did 4.5 in x 8.5 in. Keep in mind you will be folding it in half hotdog-style so it won't be as wide.

Cut a rectangle of pellon just smaller than your fabric.

Iron on the pellon, glue side down, to the wrong side of your fabric. Then fold the fabric in half, hotdog-style and right sides together, and press the crease.

Cut your buttonhole loop material to fit your button (to latch the bracelet). I did 2.25 in.

Form the buttonhole loop on the inside of the fabric rectangle and align the rough edge ends of the loop with your fabric.  Pin both ends in place.

Pin down the buttonhole loop side and the long edge next to it, leaving the other end open so you can turn it right side out later.

Stitch close to the edge of your fabric, backstitching over your buttonhole loop that is hidden inside. At the corner, drop your needle in the fabric and turn the fabric to stitch the next side  -- get a nice square corner.

Stitch around the long side of the bracelet.

Backstitch when you get to the open end.

Turn your fabric right side out. Now it's starting to look like a bracelet!

Press your bracelet (a little starch helps) and turn in the edges of the open end and press. You may want to check the length of the bracelet on your wrist. If it's mega long, snip off some length til it looks/fits right. Remember you still need to sew on a button, so leave room for that.

Stitch the open end closed.

Wahoo! Now you get to add the fun stuff ...

For a button, wrap the bracelet around your wrist, mark or pin where you want your button, and hand-sew it on.

Then add ribbon, fabric flowers, lace, ruffles, beads, jewels, and anything else you want!

I'd love to see the Fabric Bracelets you come up with, too!

Steph, thank you for joining me today!
Everyone head  on over to Anything Virtuous and check it out.  
Leave her some love!

scrapbook sundays.


Thanks you ladies for linking up last week!

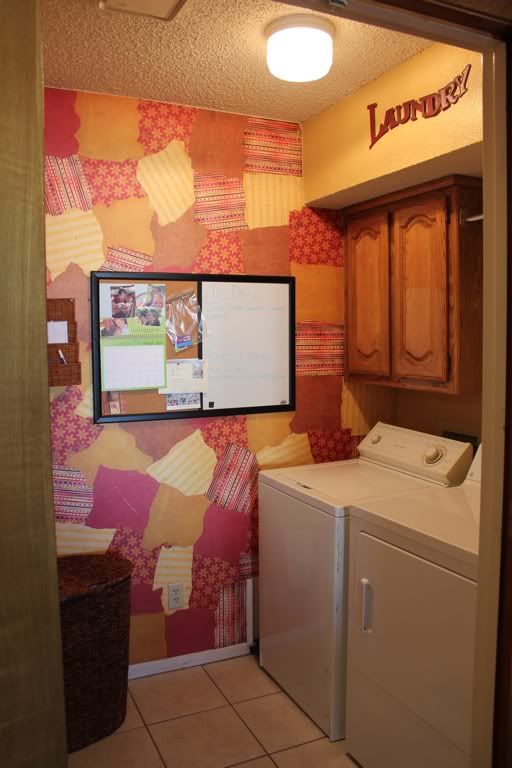
Cross my Heart Designs did the fabulous Laundry room makeover with scrapbook paper!

Scrappy Gifts fancied up these Lego Bins!  I love it.


Alright, grab yourselves a Feature button!!

This LO is just a "daily" reminder of my duties at home and that really, it'll be over before I know it.
So I wanted to record it!


I'm linking up to THESE parties!

Alrighty, show me what you got this week!
I would love for you to play along!
Rules:
Please link the specific post and not just the blog.
And please grab a button and put in somewhere on  your post or blog so that others can join us!


Pin It button on image hover